
3D Printer Nozzle Maintenance: A Comprehensive Cleaning Guide
Table of Contents
- Getting to Know Your 3D Printer Nozzle
- How to Prepare Your 3D Printer Nozzle for Cleaning
- How to Clean Your 3D Printer Nozzle
- How to Reassemble and Test Your 3D Printer After Cleaning
- How to Prevent Clogs and Maintain Your 3D Printer
- Troubleshooting Common Issues After Cleaning
- Keep Your 3D Printer Nozzle in Top Shape
- Read More
The nozzle is a small but important part of a 3D printer that greatly impacts print quality. As you use your printer, the nozzle can get clogged or dirty, causing various problems that affect its performance. This guide will discuss why it's crucial to maintain your 3D printer nozzle and give you detailed steps on how to keep it in excellent shape.
Getting to Know Your 3D Printer Nozzle
Before cleaning your nozzle, it's important to understand its role in 3D printing. The nozzle melts and dispenses filament onto the print bed, creating your 3D object layer by layer. Nozzles come in different materials like brass, stainless steel, and hardened steel, each with its own advantages and disadvantages in terms of durability, heat conductivity, and compatibility with various filaments.
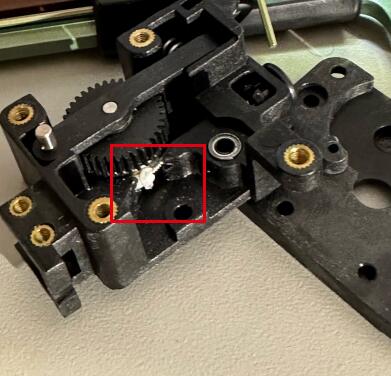
As you print, filament residue can accumulate inside the nozzle, causing clogs and inconsistent extrusion. Signs that your nozzle needs cleaning include reduced print quality, under-extrusion, stringing or oozing of filament, and poor adhesion to the print bed. Regular nozzle maintenance helps address these issues and ensures consistent, high-quality prints.

How to Prepare Your 3D Printer Nozzle for Cleaning
Before you begin cleaning your 3D printer nozzle, it's crucial to take some preparatory steps to ensure safety and effectiveness.
Start by protecting yourself: wear heat-resistant gloves to handle the hot nozzle and work in a well-ventilated area, particularly when using chemical solvents. Always disconnect your printer from its power source before disassembling the nozzle to avoid any potential accidents.
Next, collect all the necessary tools and materials, including brushes, needles, pliers, wrenches, chemical solvents, and cleaning cloths. A clean and organized workspace will help you keep track of small components and streamline the cleaning process.
Lastly, preheat the nozzle using your printer's control panel or software to soften any residue inside, making it easier to remove. Set the temperature according to the material you've been printing with, as different filaments require different temperatures for optimal cleaning results.
How to Clean Your 3D Printer Nozzle
There are several ways to clean your 3D printer nozzle, depending on the severity of the clog and the tools available. The "Cold Pull" technique involves heating the nozzle and forcing filament through it as it cools to remove residue and clogs. Minor clogs can be addressed with a small, stiff-bristled brush, gently scrubbing the inside and outside of the nozzle.
For stubborn clogs, chemical solvents like acetone or isopropyl alcohol can dissolve the residue. Apply the solvent to a cleaning cloth or brush and gently scrub the heated nozzle, being careful not to damage the surface. Always rinse and dry the nozzle thoroughly after using solvents.
Ultrasonic cleaners are effective for removing debris and residue, using high-frequency vibrations to agitate a cleaning solution. Place the removed nozzle in the cleaning basket, fill the cleaner with a suitable solution, and run it for the recommended time.
In cases of extremely stubborn clogs, manual unclogging with a precision needle or small drill bit may be necessary. Heat the nozzle, gently insert the tool into the opening, and twist it to break up and remove the clog. Be very careful to avoid damaging the nozzle.
How to Reassemble and Test Your 3D Printer After Cleaning
After cleaning the nozzle, carefully reassemble your 3D printer, ensuring that the nozzle is securely attached to the heater block and that all components, such as the thermistor and heater cartridge, are properly connected.
To ensure optimal performance, run a few calibration checks. First, perform a nozzle height calibration to verify the nozzle is at the correct distance from the print bed. Next, do a flow rate calibration to confirm the printer is extruding the right amount of filament. Finally, run a test print to check for any extrusion or print quality issues.
Consult your printer's manual or online resources for specific instructions on performing these calibrations. Taking the time to properly reassemble and test your 3D printer after cleaning the nozzle will help ensure high-quality prints.
How to Prevent Clogs and Maintain Your 3D Printer
To reduce the need for frequent nozzle cleaning and keep your 3D printer in top condition, follow these preventive measures and best practices:
Proper filament storage is crucial. Keep your filament in a cool, dry place away from direct sunlight, and use airtight containers or resealable bags to protect it from moisture and dust. For hygroscopic materials like PLA or nylon, consider using a filament dryer or dehydrator to maintain optimal filament quality.
Make regular nozzle checks a part of your printer maintenance routine. Perform visual inspections to look for signs of wear, damage, or residue buildup. This will help you catch potential issues early and prevent them from causing more serious problems.
Always use the recommended printing temperatures for each type of filament to minimize the risk of clogs and ensure optimal print quality. Avoid printing at temperatures that are too high, as this can cause filament degradation and lead to excess residue buildup in the nozzle.
Consider upgrading to a higher-quality nozzle made from wear-resistant materials like hardened steel or brass. These materials can help reduce the frequency of clogs and minimize the need for maintenance. Additionally, think about investing in a larger nozzle diameter for faster printing or a smaller diameter for more detailed prints, depending on your specific needs.
Troubleshooting Common Issues After Cleaning
After cleaning your 3D printer nozzle, you may still encounter some issues that affect print quality. Here's how to troubleshoot these common problems:
- Under-extrusion or weak infill: If you notice under-extrusion or weak infill, first check if the nozzle is partially clogged and perform another cleaning if necessary. Next, ensure that the extruder tension is set correctly and the filament is feeding smoothly. Finally, calibrate the flow rate to ensure the printer is extruding the correct amount of filament.
- Stringing or oozing:To minimize stringing or oozing, adjust the retraction settings in your slicer software and slightly lower the printing temperature. Double-check that the nozzle is clean and free of any residue.
- Poor adhesion and warping:If you experience poor adhesion or warping, first check that the print bed is level and at the correct distance from the nozzle. Clean the print bed thoroughly and apply a suitable print bed adhesive. Ensure that the printing environment is free from drafts and maintains a consistent temperature.
Addressing these common issues can ensure that your 3D printer produces high-quality prints even after cleaning the nozzle. Remember to keep an eye out for these problems and take the necessary steps to troubleshoot them as soon as they arise.
Keep Your 3D Printer Nozzle in Top Shape
A clean and well-maintained 3D printer nozzle is essential for producing high-quality prints and extending your printer's life. By understanding the nozzle's role, following proper cleaning procedures, implementing preventive measures, and troubleshooting issues, you can ensure that your printer is always ready to create amazing 3D objects. Start taking care of your 3D printer nozzle today and enjoy the benefits of consistently high-quality prints!